FO Tables
FO Tables are used to manage collections of FO instances that may have lots of data that need to be imported or edited in slide decks. All FO instances in the table must be based on the same FO Type (including its subtypes) and must all reside in a group which should ideally be restricted to the FO Type with no subgroups. FO Types such as employees, capital assets, loans, and oil wells may require a lot of parameters to specify each instance. Such data can be organized into an FO Table. FO Tables are designed to maintain a specific set of protected data layers. This help page describes the creation of FO Tables. See FO Table Views for creating various views of FO Tables and other FO Table operations such as importing data.
Input Manager consolidates all FO Tables in a model in one central location. It makes working with inputs much easier with convenient ways to visualize and edit data!
Creating an FO Table
- If not already existing, create the FO Type for the FO Table.
- If not already created, create a Case Dimension with the appropriate overlays for supporting the FO Table Value Layers.
-
If not already existing, create a group where the FOs will be residing. The group should be restricted to the selected FO Type (from step 1) and it should not allow subgroups. Do not reorganize the group, instead create an organizational style for organizing reports.
Keep all FOs in the same group, don’t reorganize, rather use an organizational style to create your own FO hierarchy for use in reports.
- Go to
- Select the overlay (from step 2), priority adjustment (if any), the start and end dates and the FO group selected from Step 3.
- If importing data, select the import data identity (see below for more details).
- Select scenario if you intend to have any computed line items (see below).
- Select FO operations available from the FO Table that you want available to FO Table users.
- Add one or more FO Table Elements (see below).
Adding or Editing FO Table Elements
Before an FO Type parameter can be displayed in the table it must be added to the table. Each FO Table may have one or more views. Some views may show an FO Type parameter, and other views might not. Adding an FO Table Element simply makes that item available for view.
There are four kinds of FO Table Elements:
- FO line items
- FO constants
- FO Connections to Hubs
- FO Attributes
FO Table Elements are added by clicking on the 3-bar Panel Menu. Select "All Elements" or via the "Add Elements" button that appears below the collapsible Table Elements list. This pops up an FO Table Elements Manager where available elements can be added and set to be editable as desired.
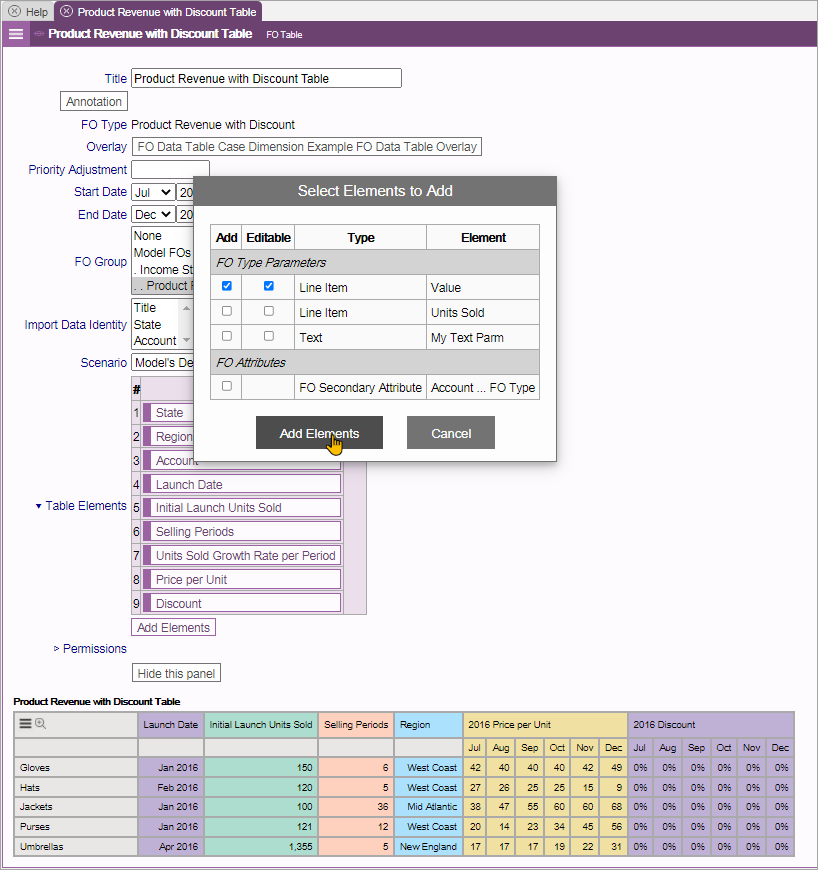
Elements already added to the table are listed under the collapsible Table Elements section. The elements can be dragged to re-order them. Right click an element and select "Delete" to remove. Click on a table element to open a panel where the element title or editable property can be changed, or to add an annotation. The panel's 3-bar "Edit" menu has the option to move the element (an alternative to drag and drop in the element list) as well as the ability to delete the element.
The FO Table
Once sufficient information is provided including at least one FO Table element has been added, the FO Table will be displayed immediately below the FO Table definition panel. Once the definition is settled, it generally does not change and it is worth hiding the definition panel (button at the bottom of the panel), thus showing only the FO Table itself where the views can be developed.
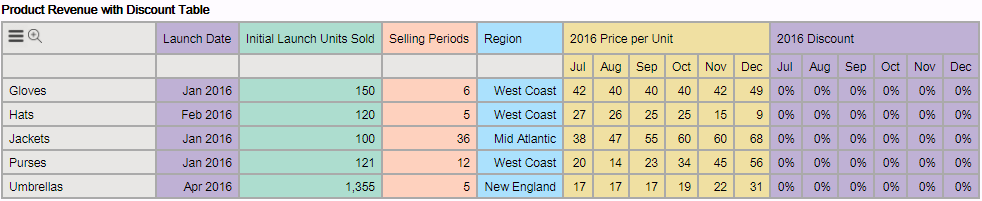
In the above table, the FOs are displayed in rows with the FO title in the first column. FO Table elements are displayed in columns, with the first 3 columns for FO Type parameters, the fourth column, "Region" is an FO Attribute, and the final 12 columns are Value Layers for two different FO line items. If editable, table values can be edited by clicking on the cell. When editing an FO Table, the Save/Cancel buttons light up on the table and will also appear in the navigation bar containing the name of the FO Table being edited. The 3-bar icon in the upper left corner pops up the FO Table popup menu. When editing an FO Table, the values can be saved by using the "Ctrl+Enter" hot key or canceled using the "Esc" hot key.
Zoom Panel View with Freeze Panes
FO Tables can be presented in a zoom-enabled pop-up panel. Click the magnifying glass icon next to the 3-bar menu to pop-up the Zoom Panel. Use the + and - keys to increase and decrease the size of the display.
Click Freeze Options to set the freeze pane area similar to Excel. Click a square in the grid for the number or rows and/or columns to freeze. The frozen rows and columns will be indicated in the grid. Click Close when done. The Zoom Panel will now scroll with the indicated rows and/or columns frozen.
Rows and columns frozen and zoom level will be retained in the model until changed.
Click Close to exit the Zoom Popup and return to the normal view.
Editable Line Items (with Value Layers) and Computed Line Items (without Value Layers)
Each FO Table element may have any number of editors. If there is at least one editor, the element is editable (only by the selected users) and viewable by all users. In addition, editable line items automatically create Value Layers for each FO line item in the FO Table. This set of Value Layers all use the same overlay, adjustment priority, start and end dates as the FO Table. Non-editable line items do not have such Value Layers and instead use the FO Table scenario to compute values for the line item and displays them in the FO Table. Thus, editable line items displays the Value Layer while non-editable ones are computed. If the overlay or priority adjustment is changed for the FO Table, then all associated Value Layers are also changed. Likewise, if the start date or end date is changed, the Value Layer is either truncated or padded with zeros. If a new FO is created in the group or an FO is moved to the group, it automatically creates a new Value Layer (initialized to all zeros). If an FO is moved outside the group, the Value Layer is removed. If all editors for a line item are removed, then all associated Value Layers are removed. A warning is issued whenever such actions remove Value Layers.
Use shortcut "f" to carry the same value forward: When you wish to hold an assumption flat, instead of entering the same value for all the remaining periods for the line item, just enter the shortcut key "f" after the number. For example, if starting in FY 24, you want to enter the value of 55 and your line item extends through FY 30, instead of entering 55 six more times, just type "55f" in the cell for FY 24. The value will be carried forward through to the end of the period: FY 30 in this example.
Adding FO Tables in Slide Decks
To add an FO Table to a slide deck:
- Go to the slide where you wish to add an FO Table
- Go into editing mode
- Select Edit / Add panel / with FO Table and then select the FO Table you wish to add
- Position and resize the new panel
- Click on the 3-bar icon in the upper right corner and select the initial view (you may need to create and store the view first). Note that this provides the capability to add the same FO Table to slide decks, each with a different initial view.
- Go back to viewing mode and test.