Input Manager
Input Manager consolidates a model's FO Tables in one central location. Compared to working with model assumptions in potentially many different FO Tables individually, Input Manager makes working with FO Table inputs much easier with convenient ways to visualize and edit data.
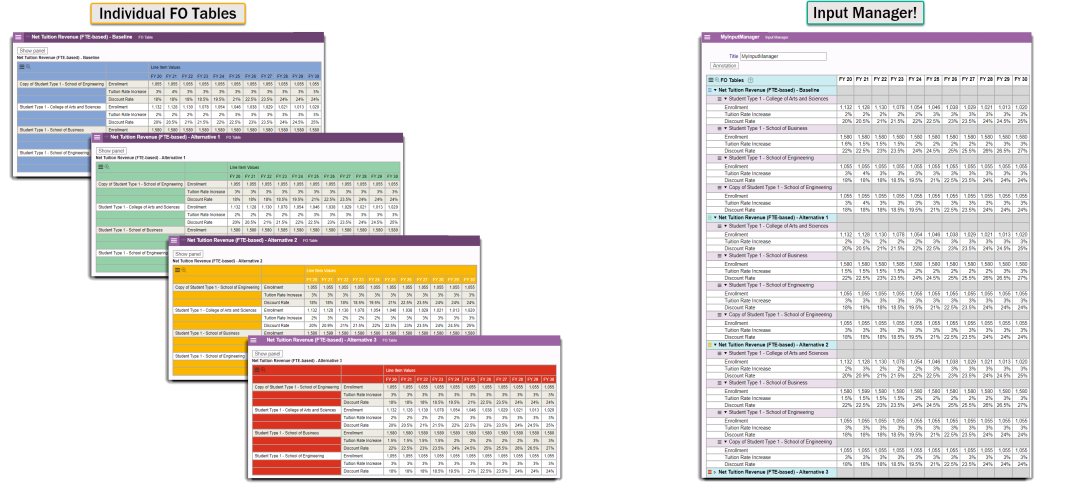
You can gather together a set of assumptions that you choose related to specific topics without having to open many different FO Table panels to view or edit them separately. Also, if multiple users are working in the same model, Input Manager will tell if an object is locked when another user is already editing it. For example, if another user is editing a value layer you try to click in a cell make an update, a message will be displayed to tell you that is locked and who is editing it.
Getting Started
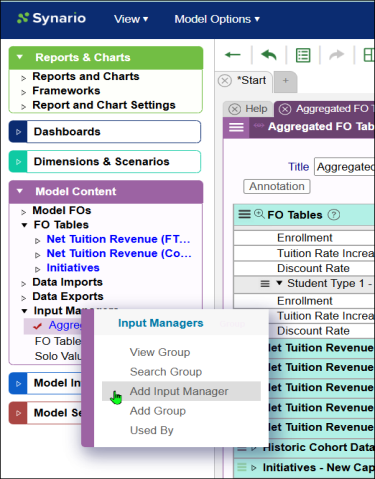
You can create one or more Input Managers with unique saved views of the FO Tables included. To create a new Input Manager, right click on the Input Managers group in the Model Content section of the Navigation Tree and select "Add Input Manager". Click into the Title field to name the Input Manager as you would like.
You can also create copies of your Input Manger. This can be done by right-clicking the name of the Input Manager and selecting copy or via the Panel Menu edit group.
High Level Summary of Input Manager Capabilities
-
Initially, 3 columns are displayed: FO Table title, Overlay, Line-Item Values. Additional columns can be added, removed, or re-organized by accessing menu options by clicking into the column header.
-
The information displayed in each column can be filtered or sorted as desired by accessing the column menu.
-
Groups (indicated by the triangle icons) can be expand or collapsed individually or all at once.
-
Any change to the view will display buttons to Save the new view or to Restore the view last saved.
-
The look and feel of an Input Manager can be customized with a variety of available options. See "Display Settings" and "Page Settings" below.
-
Input Managers created in Power User can be added to slide deck panels via the add panel or add selection operations and then choosing the Input Manager you wish to populate.
Display Settings
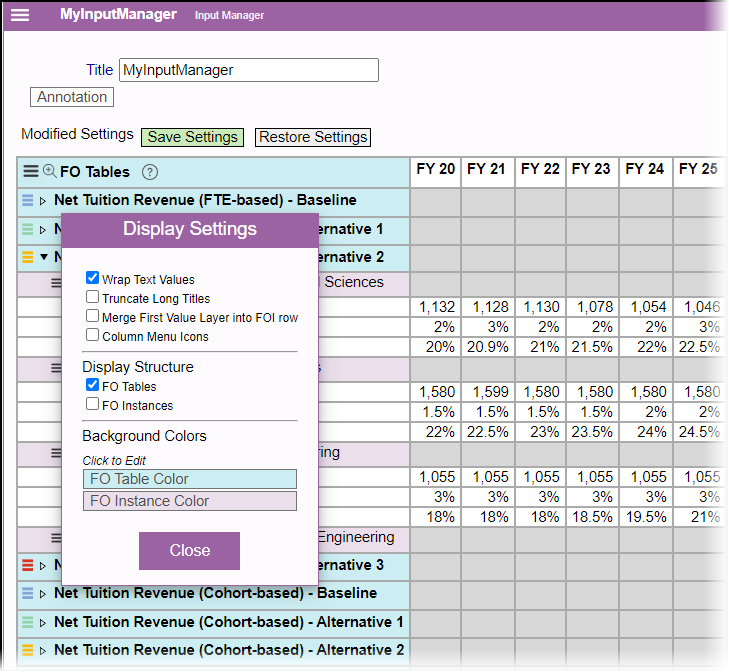
To customize the look and feel of an Input Manager, click the 3-Bar Main Menu in the top of the first column of the table and select "Display Settings". The options include:
-
Wrap Text
-
Truncate Long Titles
-
Merge First Value Layer into FOI Row
-
Column Menu Icons -to display or hide column menu 3-bar icons
-
Table Display Structure choice of FO Tables or FO Instances
-
The ability to customize the FO Table and FO Instance background colors. See Customize Background Colors below.
Display setting changes are temporary until the "Save Settings" button is selected at the top of the table. Click "Restore Settings" to revert to the display settings last saved.
Customize Background Colors
Click the FO Table or FO Instance color key to choose a customized color selection. When clicked, a color picker interface will appear with a choice of 21 colors. The associated hex code of the selected color will appear in the color code field. You can also enter a color hex code if you know it. Colors can be further customized by clicking on the desired color and then clicking into the color code field. This will pop up a full range color picker. You can modify the shade of the currently selected color from light to dark of choose a precise color and hue from the rainbow color picker.
When finished, click "Change" to apply your color choice. This will close the color picker. Close Display Settings when you are finished customizing the display. All display changes are temporary until the "Save Settings" button is selected at the top of the table. Click the "Restore Settings" button to revert to the display settings last saved.
Working with Input Manager
By default, all FO Tables in the Model will populate the Input Manager table with columns for the FO Table name, Overlay, and Line Item Values. Each FO Table can be expanded to reveal the details contained in that table. If you have edit rights to an FO Table, you can click into cells to update values as you would when working with the individual FO Table.
Use shortcut "f" to carry the same value forward: When you wish to hold an assumption flat, instead of entering the same value for all the remaining periods for the line item, just enter the shortcut key "f" after the number. For example, if starting in FY 24, you want to enter the value of 55 and your line item extends through FY 30, instead of entering 55 six more times, just type "55f" in the cell for FY 24. The value will be carried forward through to the end of the period: FY 30 in this example.
When a user is editing the cells of an FO Table value layer in an Input Manager or in a standalone FO Table, that value layer will be locked from editing by another user.
The information displayed in an Input Manager can be manipulated in many ways. FO Tables can be expanded or collapsed. Columns can be added, re-ordered, or removed. Filtering can also be applied to display the information that is needed. When any changes are made to the what is being displayed, the Save Settings and Restore Settings buttons will appear to allow you to save the view or revert to the previously saved view.
Main Parts of Input Manager
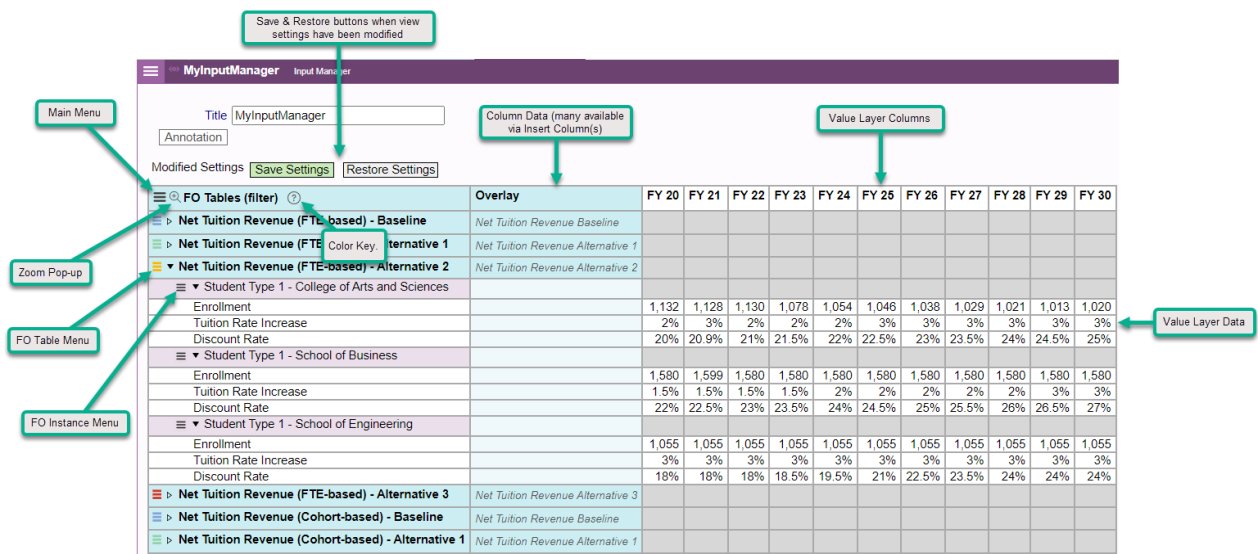
This FO Table display example shows the main parts of Input Manager. These are covered in the detail sections that follow below. Additionally, the example shows:
-
Magnifying Glass icon for Zoom Pop-up Panel: A pop-up panel of Input Manager with ability to customize the zoom factor and set Freeze Panes.
-
Help Icon for Color Key: Displays a key to explain the background colors used in the table.
FO Table / FO Instance Column
By default, the first column of the Input Manger contains the names of all the FO Tables in the model. One or more FO Tables can be expanded to reveal the table contents.
Main Menu
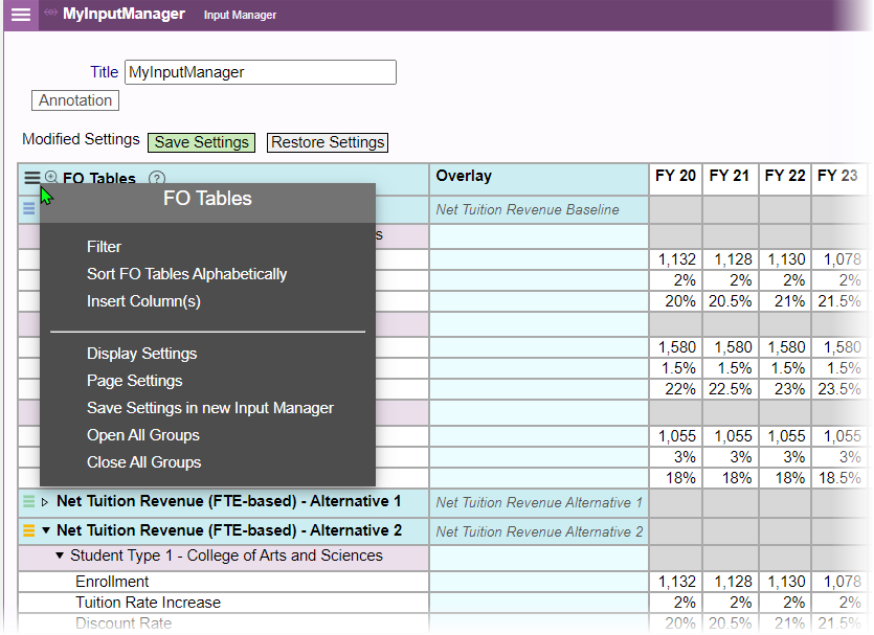
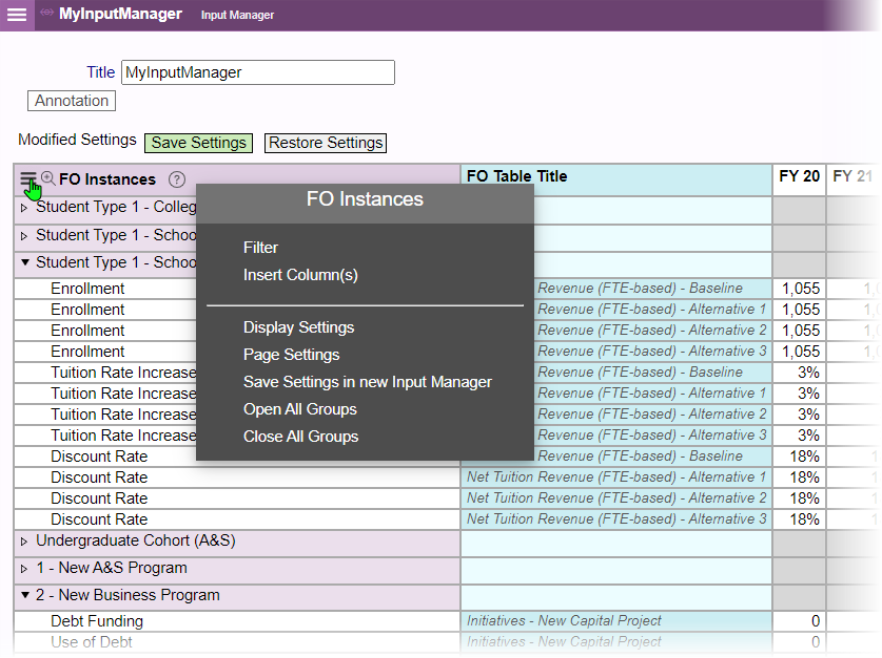
The main 3-bar options menu is located in the top left corner of the table when displaying FO Tables or FO Instances. The options included as explained in the sections below include:
-
Filter - See "Filtering Data" below.
-
Sort FO Tables Alphabetically / by Model Content (available when displaying FO Tables)
-
Insert Column(s) - See "Inserting Columns" below.
-
Display Settings
-
Page Settings
-
Save Settings in new Input Manager (when changes have been made)
-
Open All Groups
-
Close All Groups
FO Table Display
To display FO Tables, click the 3-bar top-level Menu, select Display Settings and choose FO Tables. In the example below, FO Tables are being displayed and changes have been made to the layout including adding, removing, or reordering columns, toggling between displaying FO Instances and FO Tables, etc. As a result of these changes, the Save Settings and Restore Settings buttons appear as well as the 3-bar menu option to "Save Settings in a new Input Manager".
FO Instance Display
To display FO Instances in the first column, click the 3-bar FO Table menu, select Display Settings and choose FO Instances. In the example below, FO Instances are being displayed and changes have been made to the layout including adding, removing, or reordering columns, toggling between displaying FO Instances and FO Tables, etc. As a result of these changes, the Save Settings and Restore Settings buttons appear as well as the 3-bar menu option to "Save Settings in a new Input Manager".
FO Table Options Menu
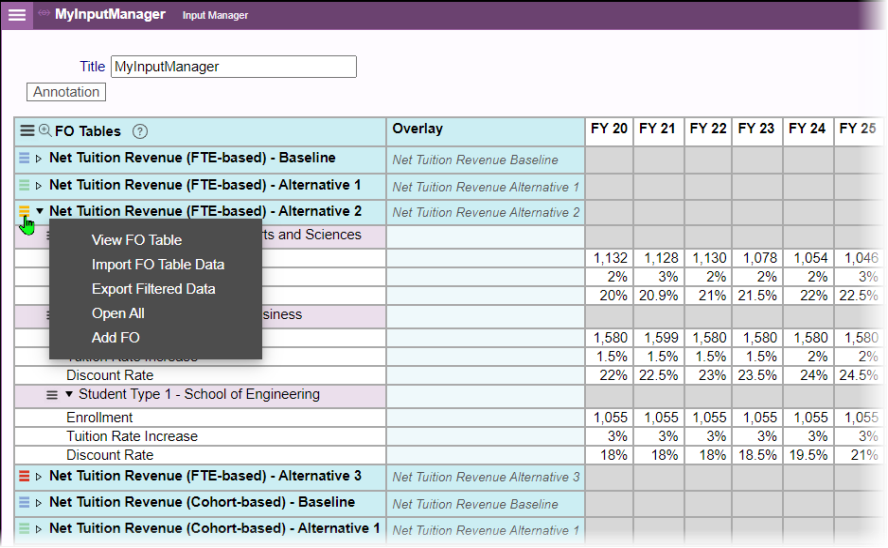
When displaying FO Tables, click the 3-bar menu next to an FO Table title for the following options:
-
View FO Table - Opens a new panel to view the FO Table individually.
-
Import FO Table Data - Opens the panel to import data into the FO Table.
-
Export Filtered Data - Exports the current filtered view.
-
Open All - Opens the FO Table and the groups it contains.
-
Add FO - Adds an FO Instance to the FO Table.
FO Instance Menu
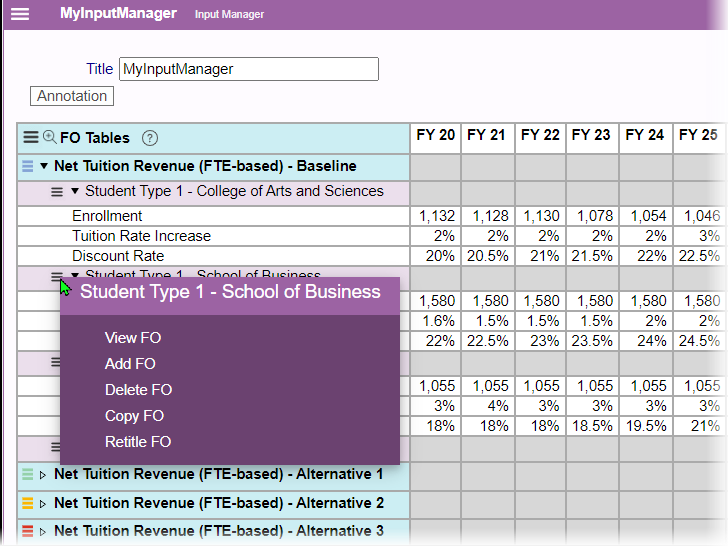
When displaying FO Tables, click the 3-bar menu next to an FO Instance for the following options:
-
View FO - Opens a separate panel to display the FO Instance panel.
-
Add FO - Add a new untitled FO to the FO Table.
-
Delete FO - Deletes the FO Instance.
-
Copy FO - Add a copy of the FO to the FO Table.
-
Retitle FO - Pops up a panel to retitle the FO.
Inserting Columns
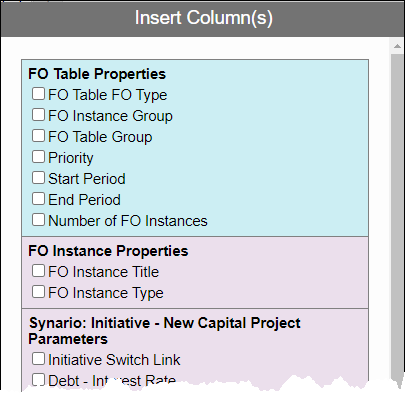
Many different columns are available to be added so that you can display only the information you want to see. To add columns to the display, click the 3-bar menu area in an existing column and select "Insert Column(s)". Items available appear in helpful, color-coded categories. Tick the checkboxes next to the items you wish to add. Columns can be also be moved later by using the "Move After" options in a column's 3-bar menu.
The columns available to be added include:
-
FO Table Properties
-
FO Table FO Type
-
FO Instance Group
-
FO Table Group
-
Overlay
-
Priority
-
Start Period
-
End Period
-
Number of FO Instances
-
-
FO Instance Properties
-
FO Instance Title
-
FO Instance Type
-
-
FO Table Parameter Categories and properties (varies by model)
-
Value Layer Properties
-
Line Item Title
-
FO Table Element Title
-
Value Layer Title
-
Example of some of the many columns available to insert (parameter categories and properties varies by model):
Value Layer Data
Clicking any of the data column headers (e.g. Years) displays the Value Layer Menu with a variety of options including the ability to reorder, insert, remove and change display format.
Merging FO Parameter Columns
Input Manager offers the ability to merge columns that contain the same FO Parameter column title. This helps to make working with an Input Manager more streamlined and intuitive. To use the merge feature, click any FO Parameter column header that you want to merge and select "Merge other FO Parameters with same title". After merging, that single column will contain the values from all of the FO Parameters with the same title.
To use the merge feature, you only need to display one FO Parameter column with the title you wish to merge.
Filtering Data
Filtering is available to customize the display of the FO Tables or FO Instances in Input Manger. To filter data, click on any column header (except the value layer columns) and select "Filter". Ticking or unticking the checkbox next to the item adds or removes that item from the display. The table updates dynamically as items are checked or unchecked.
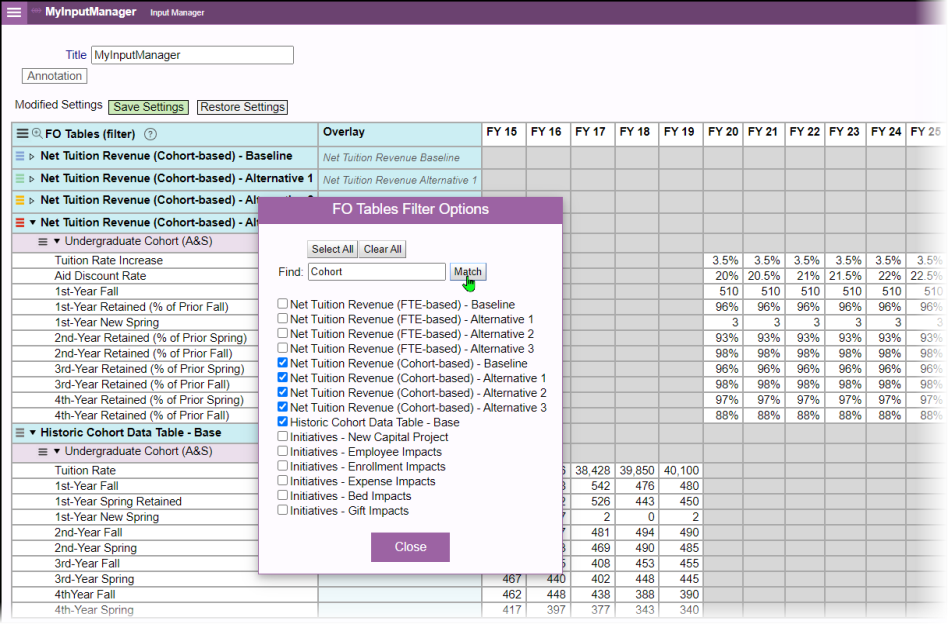
Use the Find field to search for a particular item and click the "Match" button to automatically select those items. Items that don't match the search will be unchecked automatically. To check all items, select the "Select All" button. To uncheck all items, select the "Clear All" button.
In the following FO Table filtering example for the FO Table column, a match was made on "Cohort". As a result, only the FO Tables containing the word "Cohort" are checked and thus displayed in the table. All the other items are unchecked and not displayed in the table.
Page Settings
Input Manager allows you to control precisely how much information is displayed on a page by changing the value in the Max Rows or Max Cells per Page fields. By default, 500 rows and 20,000 cells are displayed. If the information does not fit on a single page, you will see a warning that the page is truncated. By accessing Page Settings, you will see a helpful popup guiding you on how you can use can modify Max Rows or Max Cells to achieve the desired result.