Models
Models allow you to define and load your financial objects and scenarios. All models are fully protect and isolated from other models in the system. Financial data can be imported to or exported from a model. Once data or financial objects are added, they become independently part of the model. Models consist of Power User mode where the modeling objects are defined or edited and available Dashboards and Slide decks to populate and work with those objects in a presentation format independent of the under-the-hood modeling experience.
Depending on access rights to a model, when models are opened a user will first be loaded into Power User mode or in available Dashboards or Slide Decks. Again, depending on access, users can select Power User, Dashboards, or Slide Decks from the unified navigation top menu bar.
The Unified Navigation Bar
The Unified Navigation consists of a top blue menu bar which is consistent to all modes of operation - Power User, and available Dashboards, and Slide Decks and a Navigation Tree menu panel on the left-side of the workspace.
The top menu bar consists of the following menu items that when clicked consist of selections from left to right:
-
View: Drop-down menu with the following selections: Power, Dashboards, and Slide Decks.
-
Model Options: Drop-down menu with the following selections: Close Model, Retitle Model, Delete Model, Copy Model, Export Model, Library Checkpoint, Backup Checkpoint
-
Model Name: Click to retitle
-
Help: Drop-down menu with the following selections: Synario Support Center, Modeler's Forum, Help Docs (where you are now), Suggest Improvement
-
Notifications: Click to display notifications. A check box marks the item as read and a button allows you to display all (read and unread) notifications. Unread notifications automatically display when first logging on or loading a model.
-
Settings: A drop-down menu with the following selections: Turn on / off Auto Login (available for devices registered at time of login), Feature Options with checkboxes to enable or disable workspace features including the following connection line features: Show Button Connections, Show Navigation Item Connections, Show Connections to Workspace Tabs.
-
User Icon: User Status feature and Log Out.
Power User Mode
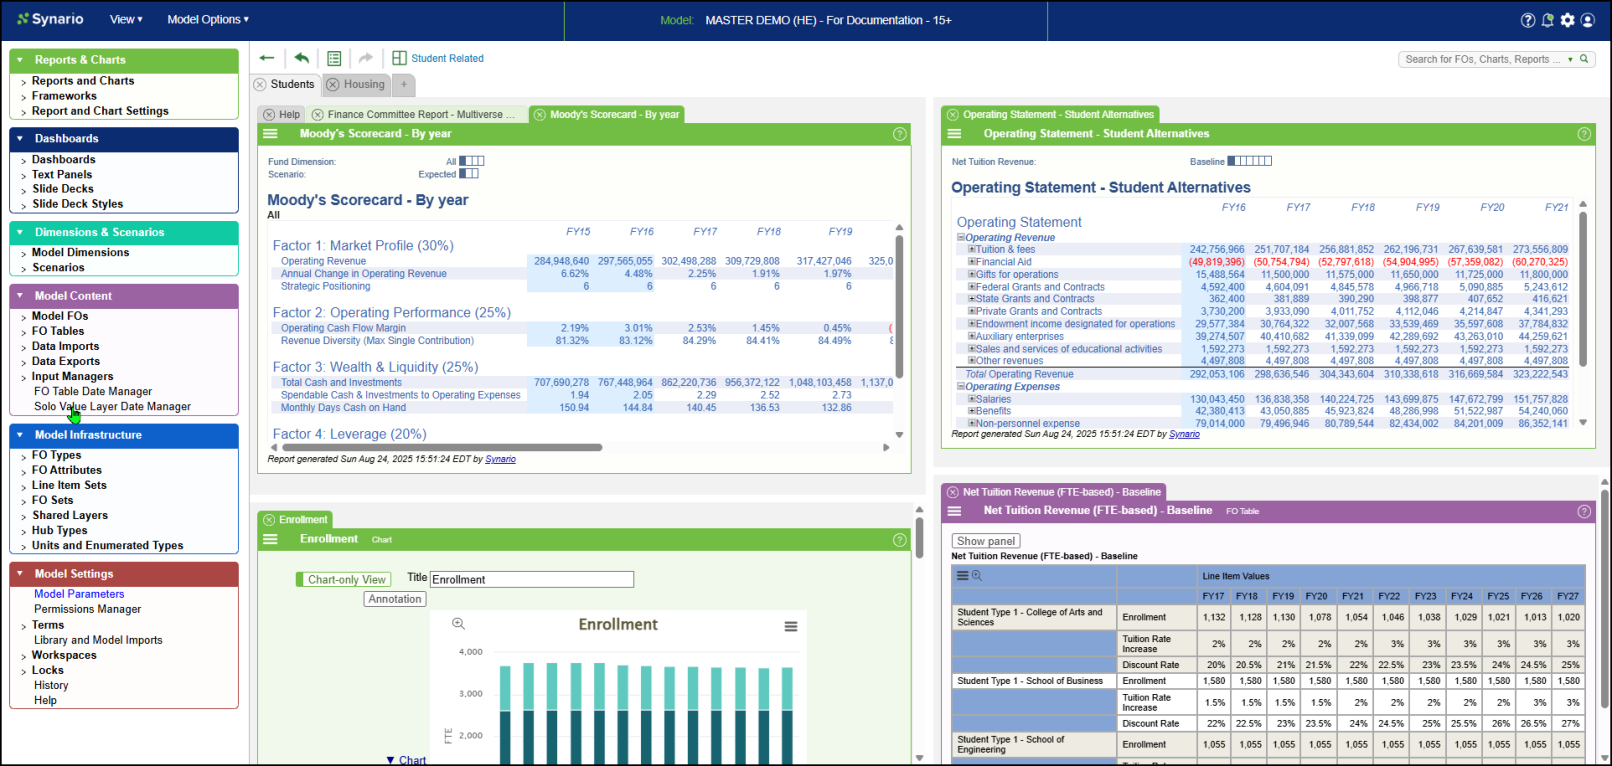
A sample workspace appears below to demonstrate the Power User Interface followed by a description of the interface:
Power User Sub-Nav Bar
The Power User Sub-Nav bar consists of the following items. Please see the many individual topics on these selections in the help system for more details. The selections from left-to-right:
-
Collapse or Expand Arrow: Hide or Show the Menu Tree Panel on the left-side of the workspace
-
Undo: Undo the last change
-
Change Log: A breadcrumb list of changes that can be Undone or Redone as long as they are consecutive changes by the same user.
-
Redo Icon: Click to quickly redo the the last change.
-
Workspace Icon: Options to Load and Save a Workspace or Show / Hide the Workspace Bar
-
Search bar: Search for Modeling Objects including Financial Objects (FOs) Charts and Reports.
Power User Menu Tree Panel
The Power User Navigation Tree panel appears on the left side of the workspace. It consists of Various expandable Modeling Categories, Groups, and Sub-groups where modeling objects can be defined and displayed on the workspace. Please reference separate topics in the help system that explains these areas in detail. The main groups are:
-
Reports & Charts: Includes Reports and Charts, Frameworks, Report and Chart Settings
-
Dashboards: Includes Dashboards, Text Panels, Slide Decks and Slide Deck Styles
-
Dimensions & Scenarios: Includes Model Dimensions and Scenarios
-
Model Content:: Includes Model FOs, FO Tables, Data Imports, Data Exports, and Input Managers, FO Table Date Manager, and Solo Value Layer Date Manager
-
Model Infrastructure: Includes FO Types, FO Attributes, Line Item Sets, FO Sets, Shared Layers, Hub Types, Units and Enumerated Types
-
Model Settings: Includes Model Parameters, Permissions Manager, Terms, Library and Model Imports, Workspaces, History, and Help (to display the help tab)
Once panels are added to the workspace, they can easily be re-arranged by dragging and dropping them around the workspace or as a tab in an existing panel.