Slides (Legacy)
Dashboards is the better way to analyze outcomes. It offers a modern, streamlined and dynamic user interface to help you easily aggregate your modeling objects including reports, charts, and input managers so you can more easily conduct scenario analysis.
A slide typically consists of a title, modeling objects such as charts, reports, input tables, and explanatory text. The page consists of the blue unified navigational top men bar and a sub-menu bar unique to Slide Deck mode.
Slide Deck sub-menu bar
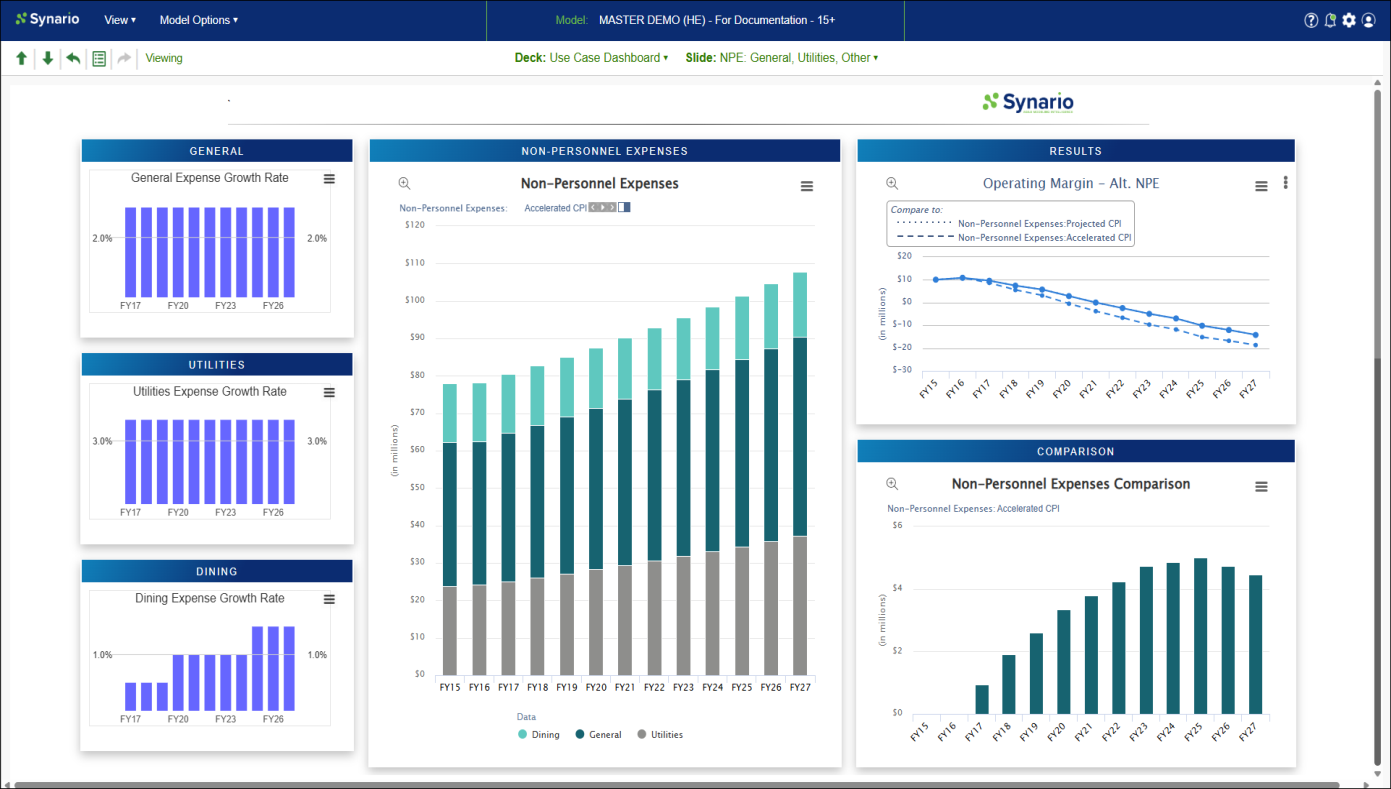
The unique sub-menu bar of slides decks (from left to right) consists of:
- Up (Previous) and Down (Next) Arrows - Display the previous or next slide. Shortcut keys are also available - Previous Slide: Ctrl + (Up Arrow) and Next Slide: Ctrl + (Down Arrow).
- Undo Icon- undo previous change (unless someone else has made the most previous change).
- Change Log: A list of changes and ability to Undo or Redo consecutive changes by the same user.
- Redo Icon- restore the previous undo.
- Viewing / Editing Mode - toggle button to switch between Viewing and Editing Mode (only visible to editors). When in Edit Mode, an drop-down Edit Menu appears.
- Deck and Slide Name
- Log Out - Closes the slide deck interface and logs you out of the platform.
Viewing Mode
Editing Mode
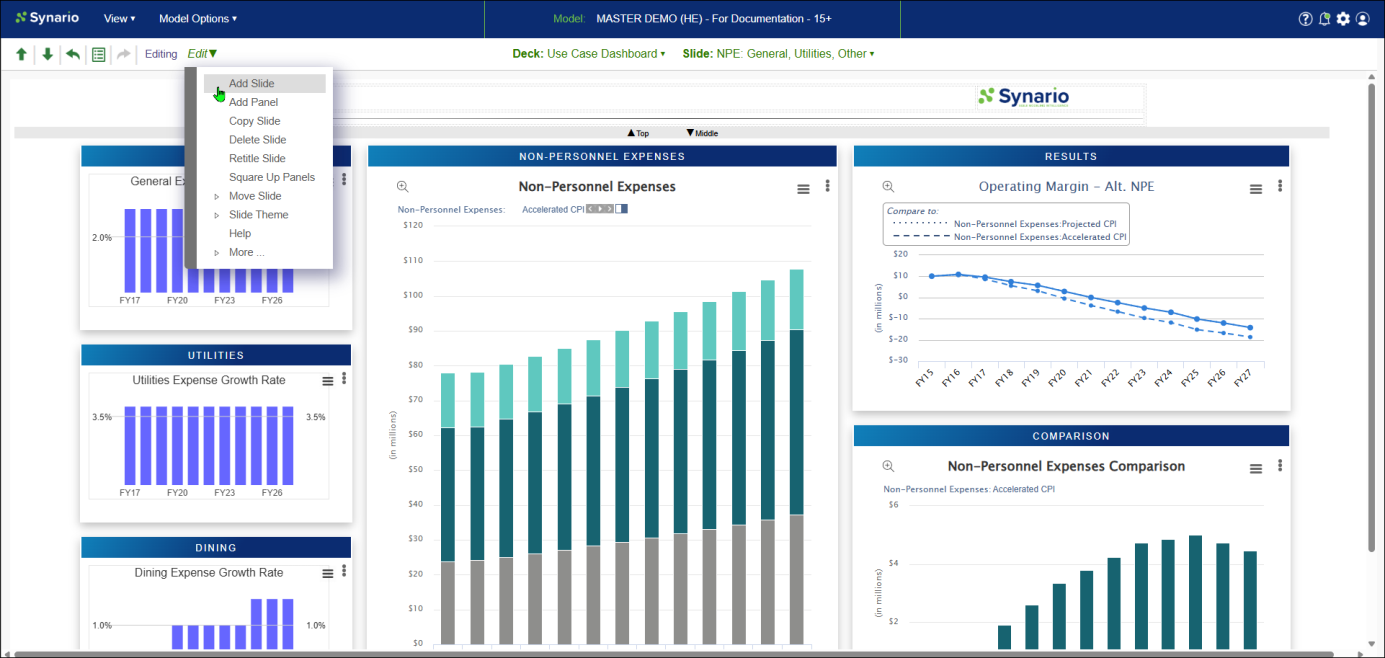
In editing mode, the slide will look a bit different with various dotted lines outlining tables and panels. Each slide will have (from top to bottom, see picture below):
- Common header panel (a panel that is optionally shown in every slide)
- Top panel (an optional panel, not used below)
- Display area of panels (Text panels, Chart panels, and Report panels)
- Common footer panel (a panel that is optionally shown in every slide)
Edit Menu
The edit sub-menu includes the following selections:
- Add Slide - Displays a template to choose which regions of the slide to create one or more new panels.
- Add Panel - Starts a wizard for selecting or searching for the type of object to add to the panel (Chart, Report, FO Table, Value Chart Editors, Text and Other Panels). The selected object will be appear in a preview window. Complete the operation by choosing to add to: Current Slide or a New Slide.
- Copy Slide - Makes a copy of of the current slide.
- Delete Slide - Deletes the current slide.
- Retitle Slide - Retitles the current slide.
- Square Up Panels - Makes it easier to edit the panel layout on a slide by resizing the existing panels. Continue with any additional manual resizing or moves.
- Move Slide - Options to move the slide to the desired position in the deck or to another slide deck.
- Slide Theme - Select the slide theme to apply.
- Help - Displays this help page.
- More - Various Header and Footer options.
Display Area Panels
Panels in the display area can contain any of these object types via the "Add a New Panel or Slide" menu:
- Charts
- Reports
- FO Tables
- Input Managers
- Value Chart Editors
- Text and Other Panels
Panels in the display area are organized by columns and sections. Available sections appear logically as rows and can be moved between top, middle and bottom sections. Panels can be resized and moved around in Edit Mode.
To resize a panel, drag the right or bottom border of the panel. Resizing the width of a panel resizes the width of all panels in the same column of that section.
To move a panel, drag the top border to a new location. Panels can be moved to new columns on far left or right and to other sections.
Moving a panel can be accomplished via click and drag or selecting an appropriate move option under the 3 bar icon in the upper right corner of a panel as mentioned below.
While in Edit Mode, click on the 3 bar icon in the upper right corner of a panel for the following panel options:
- Copy Panel to Add Elsewhere - Copies all the selections of the panel to the clipboard to add to another panel on a different slide.
- Add Copied Panel Selections - Available when a panel's selections have been copied.
A warning appears when trying to add copied selections to the same slide or for selections that already exist in any panels on a different slide.
- Move Panel - Options to move the panel to different areas of the same slide.
- Delete Panel - Removes the panel from the slide.
delete it, re-title it or change its theme. A text panel must be titled before it can be used as a selection in a selectable panel or copied to another slide.
Selectable Panels
A selectable panel is a panel that can switch between a predetermined objects including text panels, reports, charts, and FO Tables. The panel's 3-dot menu is used to choose the selectable to display in the panel during a presentation. The initial (or default) selection can be set in edit mode (see below). All reports and charts can be added as a selection.
Editing Selectables
To add to or modify the available selections, toggle into Edit Mode. While in Edit Mode, the panel's 3-dot menu offers the following options:
- Add Selection - Displays a wizard for selecting or searching for an object type. The search bar can be used to find an object or filter the list. Clicking on an object name displays it in a preview window. The operation is completed by clicking "Add to Selectable". The list of available objects includes:
- Charts
- Reports
- FO Tables
- Input Managers
- Value Chart Editors
- Text and Other Panels
- Delete Selection - Removes the current selection from the available selectable list.
- Choose Selection - Used to choose the selection to appear as the initial (or default) selection.
- Retitle Text Selection - Text and Other Panel selections can be retitled. Click to display the list of objects and select one to retitle it.
Text Panel and HTML Editor
The common header panel, common footer panel, the top panel and all text panels of the display area use standard HTML for displaying information. An HTML editor based on CKEditor is used to insert and modify text panels. Text panels may also include images, links, and software Components (see below). When you click on a text panel, a yellow popup panel will appear with various icons for editing the panel. The icons include commands for:
- Usual set of text formatting commands
- Insertion of special characters, images, and software Components
- Directly editing the HTML source code
- Selecting a style (from the css styles in the Slide Deck Styles)
- Inserting an HTML template (from the html templates in the Slide Deck Styles)
Software Components
Software Components can be inserted any where in a text panel, and can be modified or deleted at any time. To insert a WEB component, click on the icon in the lower right corner of the yellow popup HTML panel. To modify it, simply click on the dotted red box. Software components include:
- Current Slide Title (used in the default common header panel)
- Titles for Model Dimensions, Scenarios, Cases, and Case Parameters
- Scenarios
- Case Parameter Values
- Term (select a Term from the available Term Sets)
- Model Value (by selecting a Start Period, Span of time, Scenario, and Line item or group)
- Table of case parameters (by selecting any Case Dimension)
- Link to another slide (possibly in another slide deck) or list of links if a slide deck is selected, or a groups of lists of links if a group is selected.
Many of the above software components have an editing option allowing certain users the capability of changing the value. More software components will be added by request.
Report Panels
A report panel displays one of the model's reports with a framework. In editing mode, all report popup menus are available for editing the report. In viewing mode only a few options are available. Reports can be exported to HTML or CSV by clicking on the report title. Explanations are also available if permitted by the report, and that can only be changed by editing the report panel in power user mode.