Formatting Reports with Styler Rules
Styling a Report
You can add or modify formatting in a report by clicking individual cells, rows, columns or titles and selecting "Styling". In the example below, the FY25 column is clicked and "Styling" is selected. A dialogue pops up to display the Existing Rules(s) in place for the column and the ability to create new styler rules for Title or Column. Also included is the ability to "Copy Formatting from Other Rules" where you can select formatting from other rules to add to your Styler.
Formatting your reports with Stylers is available in Power User and for the reports you use in your slide decks!
In the example below, we've clicked on the FY25 column and selected "Styling" from the menu. A window appears with the options to create a new styler rule for TItle or "Copy Formatting from Other Rule" for the new title styling rule. Similarly, we can do the same for Column.
We can also edit existing rules by clicking on them such as "Framework Column Titles" in the example below.
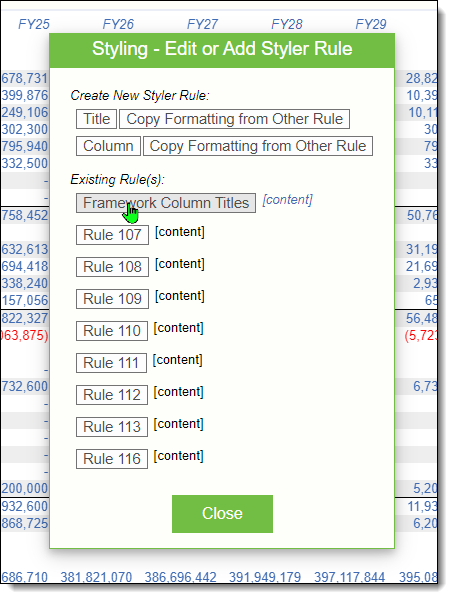
Creating or Editing a Styler Rule
In this example, we've clicked on the "Frameworks Column Title" button to edit the styling associated with it. Note that the formatting that has been applied is shown as a preview to the right of the button in the word [content].
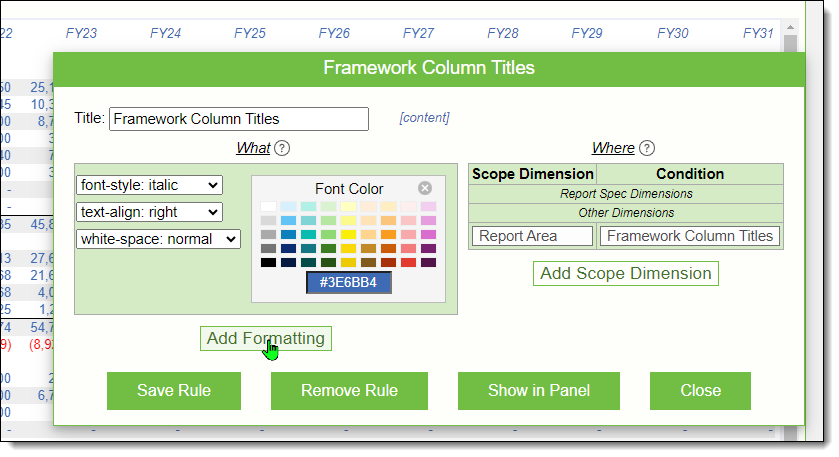
Parts of a Styler Rule
What - The left-side of the Styler Rule window is the formatting that you create to apply to parts of your report. You can click existing formatting to edit or remove them, or can add new formatting by selecting the "Add Formatting" button.
Where - The right side of the Styer Rule window is the Scope Dimension and indicates "Where" or what parts of the report that the formatting applies to. You can click an existing dimension to modify or delete them, or you can create a new dimension by clicking the "Add Scope Dimension" button.
Add Formatting ("What")
The left-side of the Styler Rule window is the formatting that you create to apply to parts of your report. Click "Add Formatting" to add formatting to the rule. See below for the many available formatting options. You can also edit existing formatting choices.
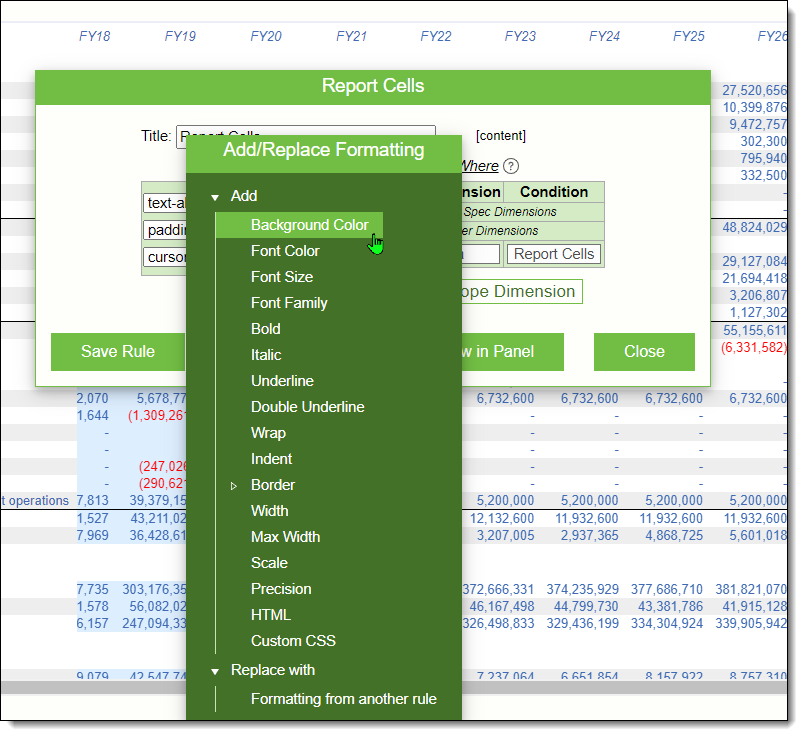
Formatting Options
When one or more of the available formatting options below are added or edited, you customize that option via drop down choices. For example, choosing Bold, adds the CSS tag "font-weight: bold". You can modify this by clicking the drop-down list and selecting something different like "font-weight: bolder". The following formatting options are available:
-
Background Color
-
Font Color
When you select Background Color or Font Color, an HTML Color Picker will appear as shown below:
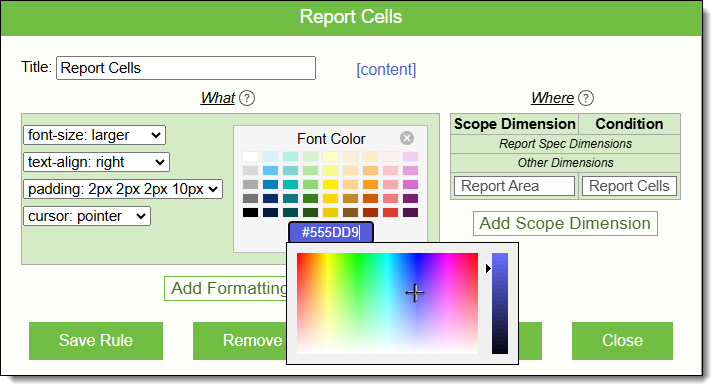
There are various convenient ways to get the exact color you are looking for. As an example, you can click one of the color squares that are offered and the corresponding HTML color code and corresponding color will be shown in the color code field. You can modify the color further by clicking directly into color code field. This will pop-up a color selector where you can drag the pointer across the spectrum and preview the results. The color picker also includes a bar where you can drag the selector to the precise shade of the color you want. As you drag across the color spectrum and shade, the color code field updates to display the HTML color code and the corresponding color. You can also type in an HTML color code directly if you know one.
For a detailed reference on HTML Color Codes, see W3Schools HTML Color PIcker.
-
Font Size
-
Font Family
-
Bold, Italic
-
Underline
-
Double Underline
-
Wrap
-
Indent
-
Border: Select from All, Left, Right, Top, Bottom
-
Width
-
Max Width
-
Scale - Select from Units, Thousands, Millions.
-
Precision - Selections include: Units, Tenths, Hundredth, Thousands, Ten Thousands, Hundred Thousands, Millions, Ten Millions, Hundred Millions, Billionths.
-
HTML - A text panel will appear where you can add custom HTML code.
You can get assistance in writing HTML code by visiting W3 Schools HTML Tutorial.
-
Custom CSS - A text panel will appear with fields where you can add a CSS Name and CSS Property value.
To get help with writing custom CSS, you can visit the W3 Schools CSS Tutorial.
Add Scope Dimension ("Where")
The right side of the Styer Rule window is the Scope Dimension and indicates "Where" or what parts of the report that the formatting applies to. Click "Add Scope Dimension" to decide which parts of the report the formatting should be applied to.
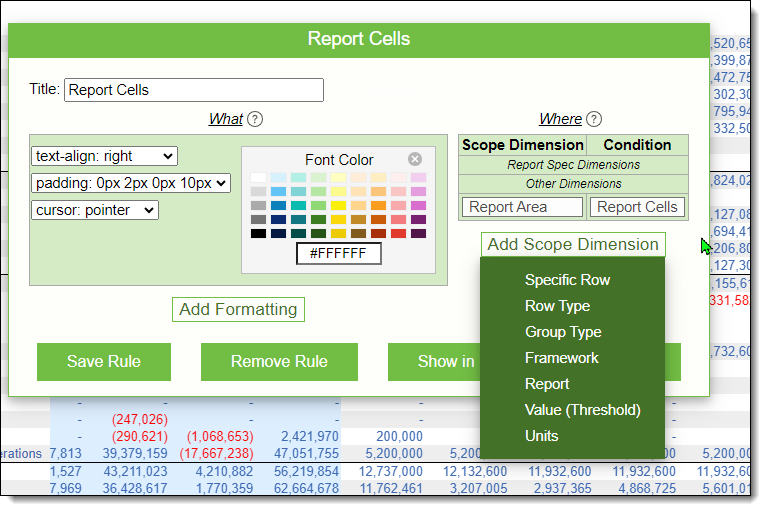
Scope Dimension Options
When one or more of the scope dimensions below are added or edited, you select conditions to apply to the dimension:
Specific Row - Drill-down to select the line item to apply the rule to.
Row Type - Select from Table, Group, LineItem, Title, Text, Blank, CaseParameter.
Group Type - Select one or more from Closed, Opened, Total, Average.
Framework - Select one or more Frameworks in the model to apply the rule to.
Report Area - Select one or more areas of the report to apply the rule to. Options include Report Title, Report Subtitle, and many others.
Report - Select which reports in the model to apply the rule to.
Value (Threshold) - Type in the Min and Max values.
Units - Select one or more units including Monetary, Percent, Annual Rate, Period, and many others.
Footnotes
Adding a New Footnote
Click on a cell in a report and select "Footnotes" from the pop-up menu. Add text for the footnote and click the "Add Footnote" button. The new footnote will appear below the report. You can also add a footnote rule in the Styler used for the report.
Editing an Existing Footnote
Click on a cell containing a footnote and select a footnote rule to edit. In the Styler Rule for the footnote, you can modify the existing text, add formatting or edit the scope dimension for the footnote. You can remove the footnote by deleting the rule. Select the footnote rule's 3-bar menu, click edit and then "Delete". You can also go to the Styler for the report to edit footnote rules.