Solo Value Layer Date Manager
The Solo Value Layer Date Manager report allows you to view a list of all the Value Layers in your model. To access this report click on the

Description of Columns in Table
Title – Name of the value layer. Clicking on this takes you to the particular value layer.
FO Title or Parent – Specifies the FO Instance & line item in the instance that houses the value layer. Clicking either one takes you to that particular location.
Overlay – Allows you to view the overlay for a particular Value Layer.
Overlay Priority – If you’ve assigned a priority to any Value Layers it will appear here. If no priority is assigned it will show 0+0.
Value Layer Title – If you’ve named the Value Layer it will appear here.
Start Date – Allows you to view the start date for a specific Value Layer. Clicking on the actual date allows you to update the year.
End Date – Allows you to view the end date for a specific Value Layer. Clicking on the actual date allows you to update the year.
Select – Allows you to select individual or multiple Value Layers. When you select a Value Layer an operation option appears which you can click on to shift dates or values (see image below).

Shift Options
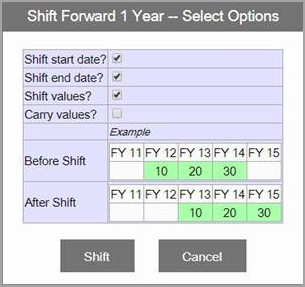
Selecting ‘Shift Dates or Values’ opens up a pop-up window similar to the following: By default "Shift start date" and "Shift end date" are selected. See below for all options that can be used.
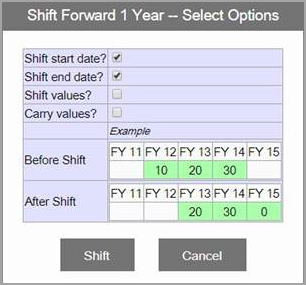
There are four options to choose from. There is a visual diagram that updates as you check off each option to demonstrate the results that will occur for the data in the Value Layers selected, after the shift action is performed.
When shifting forward, you need to make a decision on whether to move the years forward or not (maybe I want to keep the first year, maybe it’s no longer relevant) and you need to make a decision on whether or not to shift the values forward (if something occurred 3 years in the future before, is it still 3 years in the future, or does it move closer by a year – either could be reasonable options depending on the situation).
Important: If you have any relative dates, you will need to change them to hard dates prior to shifting or the shift option will not work.
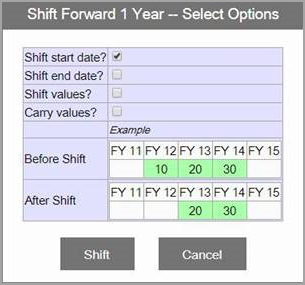
Shift Start date – If your value layer’s start date is FY12 the new start date will be FY13. Values remain with the original year. In this case FY13 was 20 before the shift & will remain 20 after the shift. You may choose to shift the start date when updating prospective assumption tables as you will most likely want them to start a year later.
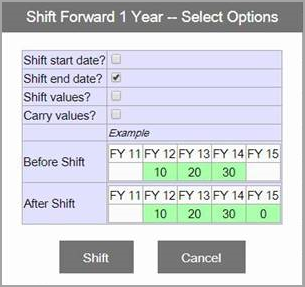
Shift End Date - If your FO Table’s end date is FY14 the new end date will be FY15. Values remain with the original year. The end year, FY15, will display 0 as it did not exist before the shift. You will want to shift the end date when updating prospective assumptions because you are adding an additional year to your model.
Carry Values – Allows you to carry the last value before the shift to the new end date. FY15 has the same value as FY14. This may be beneficial if you’re extending your model years and want to carry your last assumption to the new end year.
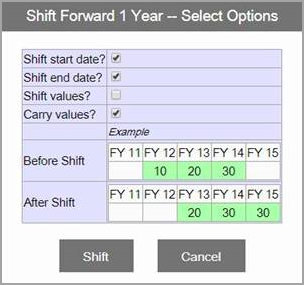
Shift Values – Allows you to shift values as you shift years. In the case above the start & end dates shifted but so did the values. FY13 shows the value that was in FY12 before the shift. You may choose to use this when shifting assumptions related to projects or initiatives that are delayed.