FO Designer
FO Designer provides for an intuitive and streamlined approach for building and modifying Financial Objects (FO Types and FO Instances) and Formulas in Synario. All the needed information is displayed in a single view versus needing to reference many different panels. This helps you better work with, visualize, and understand how layers and formulas are used to compute numbers for any FO Instance Parameter, scenario, and time period.
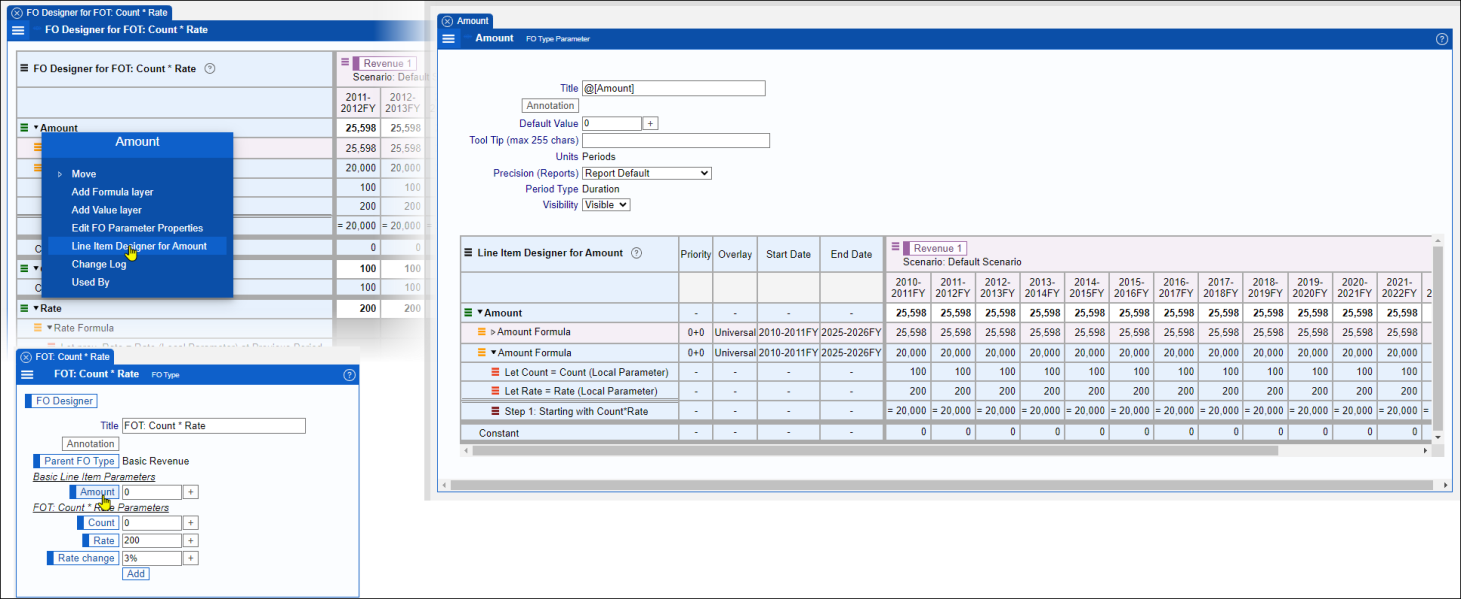
FO Designer can be accessed via panel buttons, panel menus, or via right-click in the menu tree for FO Instances and FO Types or by clicking on Shared Layers. FO Designer will appear automatically for a single Line Item Parameter when clicking a specific Line Item button on an FO Instance or FO Type panel.
General Layout of FO Designer
While there are some differences, much of the layout is common to FO Designer for Financial Object Types (FOT), FO Designer for Financial Object Instances (FOI) and FO Designer for Shared Layers. Line Item Designer also shares much of the same layout.
Rows are used to display computed results for FO Line Item Parameters, the Value Layers nested in the Line Items and the Formula Layers with individual Lets & Steps.
Data Columns display computed results for specific FO Instance, scenario, and time period.
At the top level, FO parameters such as line items will be shown, one per row. Layers are always ordered by priority with the highest priority at the top and the lowest priority (the constant) at the bottom. Line Items can be expanded to show all layers, both local and non-local, that may be involved in computing that line item’s values.
The screenshot below demonstrated an FO Designer for a Financial Object Type:
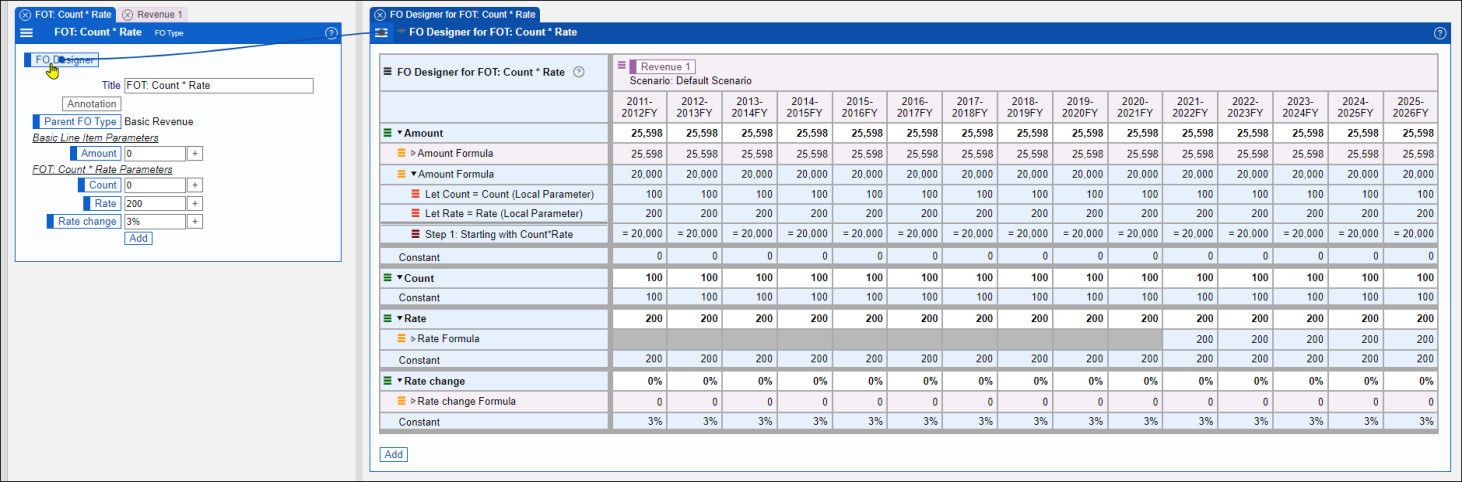
In the above example, FO Designer for Financial Object Type (Count * Rate) was displayed by clicking the "FO Designer" button at the bottom of the standard FO Type panel. Likewise, FO Designer for FO Instance can be opened the same way but from an standard FO Instance panel. Also, clicking the purple FO Instance button will open the standard FO Instance panel showing the line item parameters for the instance.
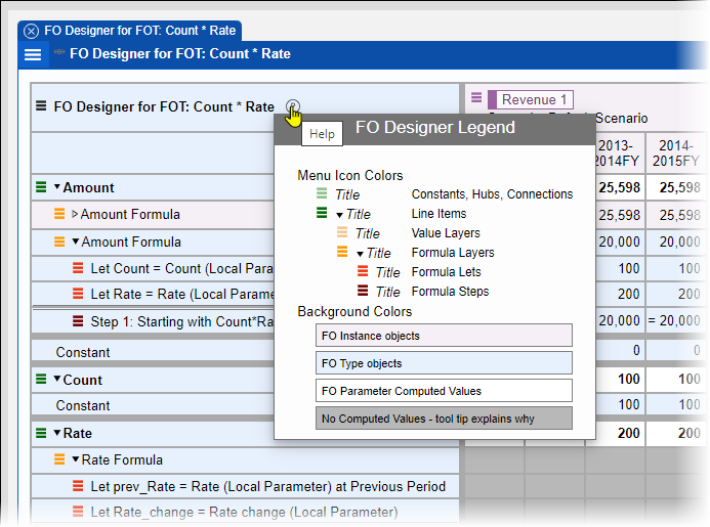
The colors of 3-bar menus and table shading help differentiate the various elements of the table. To display a legend for this, click the ? icon next to the FO Designer name.
Row and Column Display Options
You can modify what FO Parameters to display in rows or what other information to display in columns by clicking the black 3-bar menu next to the FO Type name. Tick or un-tick the options as desired. You can choose to apply the changes to persist the next time the model is loaded by ticking "Save as new Default Settings". Click "Change Settings" to save the changes.
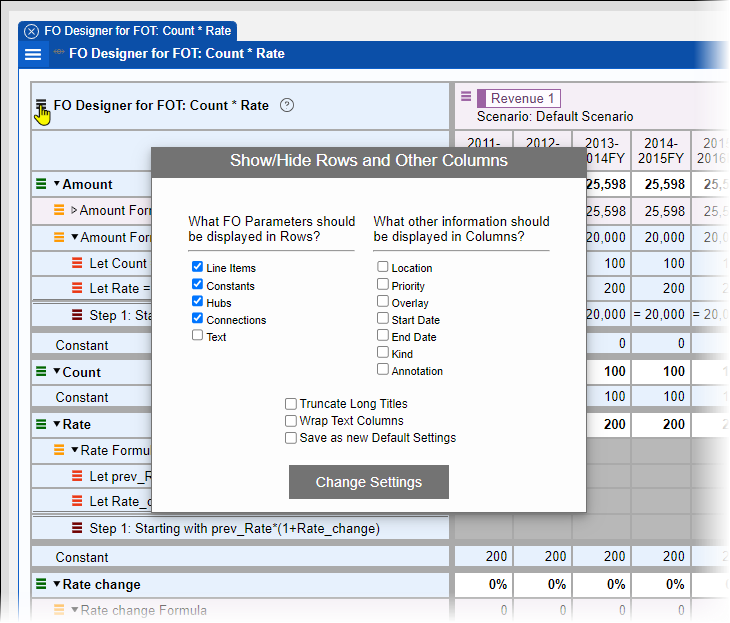
Note: FO Designer for FO Type and FO Designer for FO Instance share the same option selections. Changes made in one will also apply to the other.
FO Instance Display Options (FO Designer for FOT only)
By clicking the purple 3-bar menu to the left of purple FO Instance buttons in FO Designer for FOTs, you can modify display and other options as desired. In addition to being able to select the FO Instance, you can select the Start Period, Number of Periods, and Default Scenario. You may also choose to display the data as a chart instead of a number and set the rounding precision.
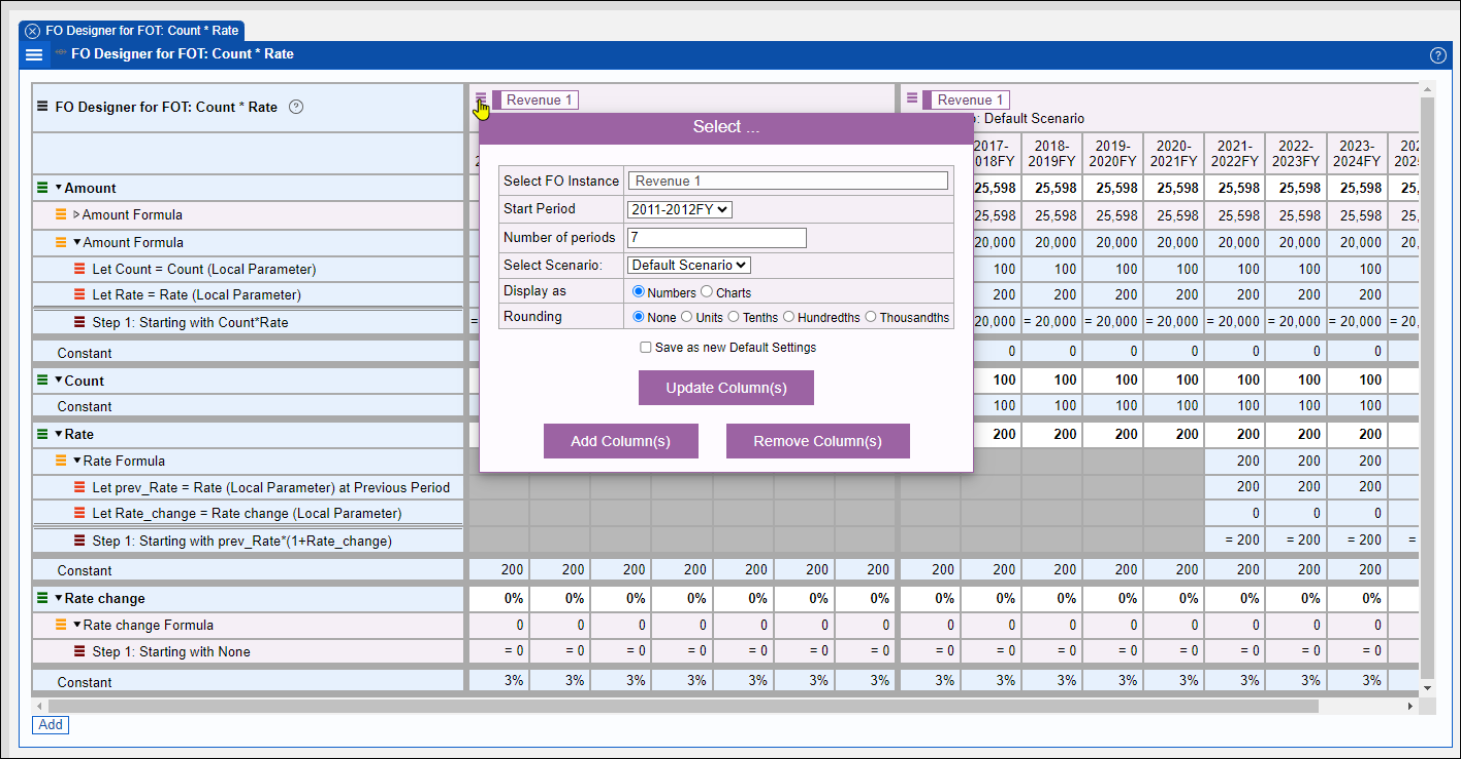
You may choose to update the current column or to apply those changes to a new column. This is convenient for making comparisons between FO Instances as shown in the example above. You can also remove the current column. Enable "Save as new Default Settings" before selecting the Update Column(s), Add Column(s), or Remove Column(s) button if you wish for the changes to persist next time the model is opened.
Note: FO Designer for FO Type and FO Designer for FO Instance share the same option selections. Changes made in one will also apply to the other.
When additional FO Instance columns have been added and you want to change options, choose the 3-bar menu for the FO Instance you want to update.
Editing Local and Non-Local Layers
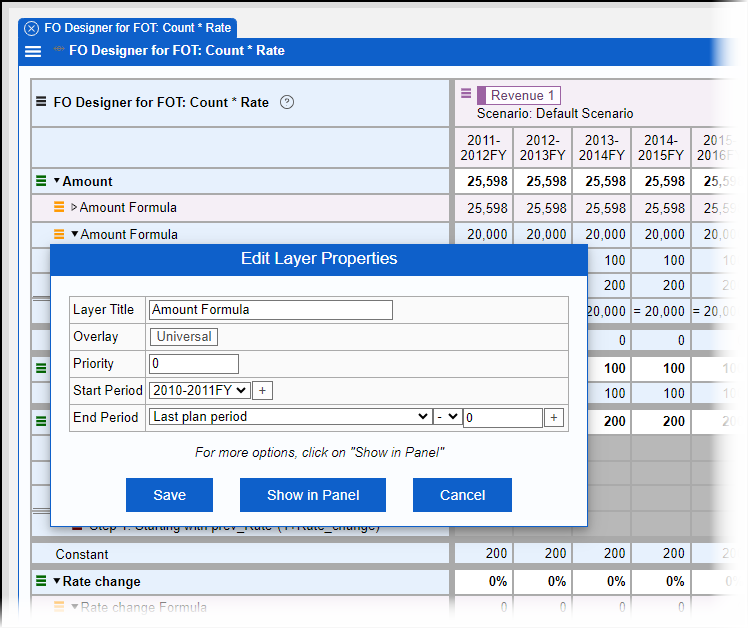
Local Layers can be edited by clicking the orange 3-bar menu to the left of the layer name and selecting "Edit Layer Properties". Operations include Adding Lets and Steps, Copying the layer within the line item or to other items, and deleting or editing layer properties. Editing layer properties pops up a panel with common options for changing priority, overlay and start and end dates. Additional options are available from this popup by clicking the "Show in Panel" button.
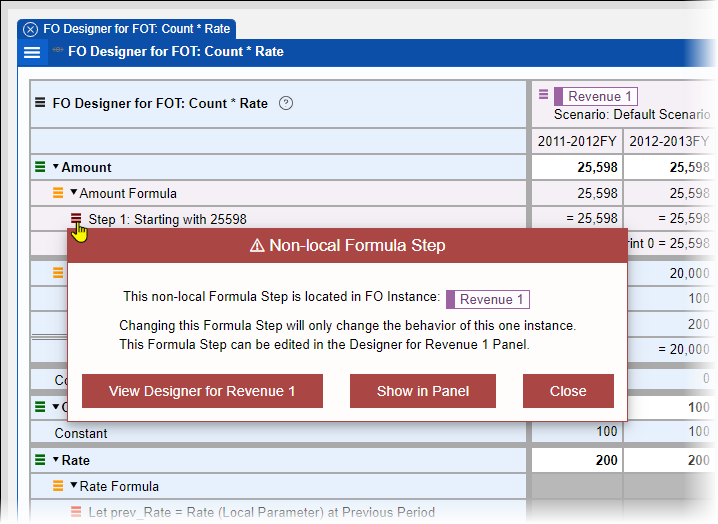
A non-local layer is one that is associated with a different object and is not directly editable in the FO Designer panel. If an attempt is made to edit a Non-local layer, a popup window will explain that it is a non-local layer and will provide the option to view the appropriate FO Designer for editing that layer.
Adding Parameters (FO Designer for FOT only)
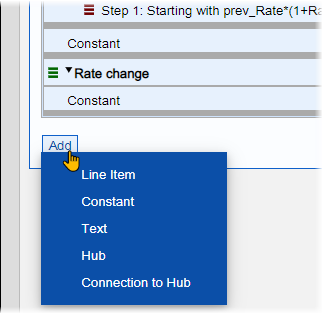
Parameters including Line Item, Constant, Text, Hubs, and Connection to Hub are added to FO Designer for an FOT via the "Add" button at the bottom of FO Designer for FO Type panels. This is similar to how they are added from FOT panels. Each selection pops up the appropriate panel to set parameter properties for the type added.
Formula and Value Layers
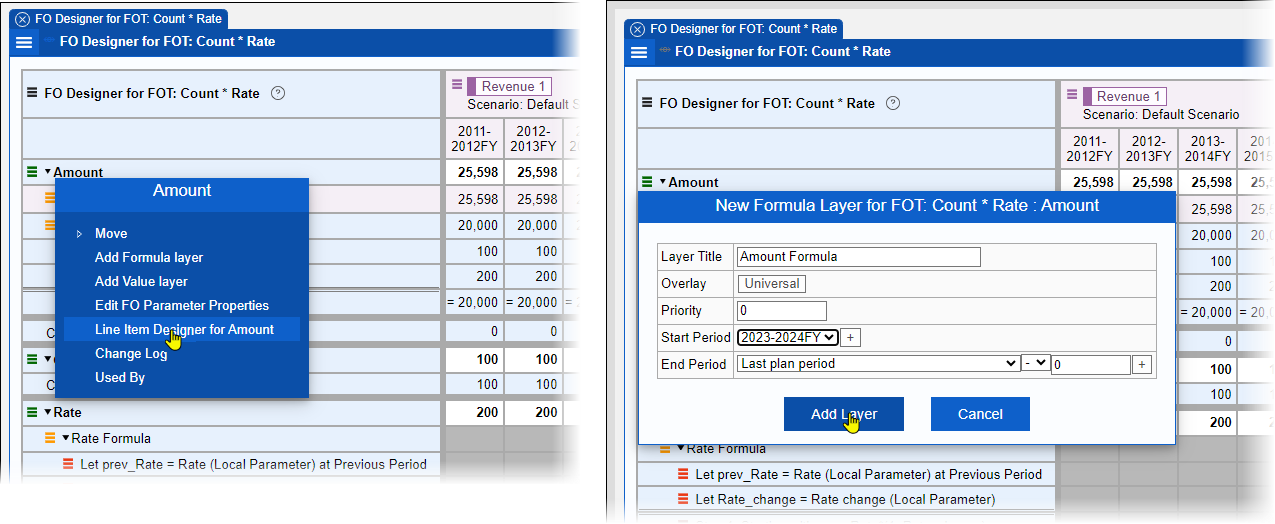
Formula Layers and Value Layers are added through the FO Designer dark green 3-bar menu.
Creating Formulas
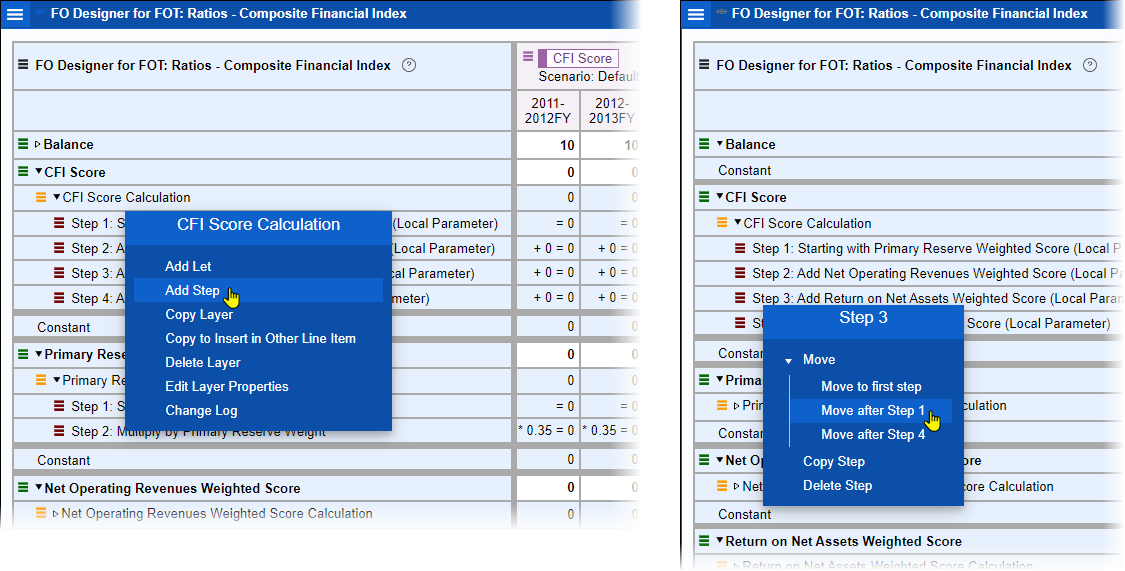
Add a Let or Step by clicking the orange 3-bar menu of the Formula Layer . If the formula is in a local layer, each Let & Step can be edited, copied, or moved. This includes the ability to copy to insert in another parameter's formula.
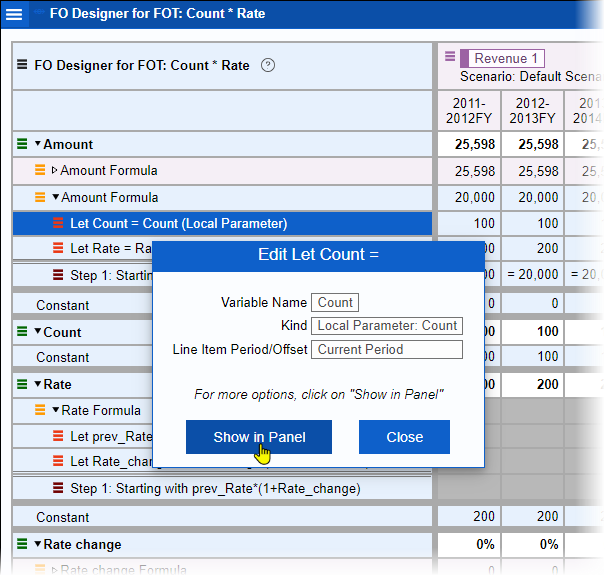
A Let or Step can be edited by clicking on its name. This will popup a quick change panel for updating the most common elements, with an option to Show in Panel for viewing all options
Writing Expressions with Quick Lets & Steps
Lets and Steps can be created or edited in the local Formula Layers in FO Designers for Financial Object Types or Financial Object Instances.
Creating Lets
Lets can be created separately from Steps to define all variables first but also if any variables are used in Steps that are not yet defined, FO Designer will show them in a table where the kind of Let can be defined.
Click the orange 3-bar menu to the left of a Formula Layer and select "Add Let". A dialogue box will appear with a unique variable name preselected. Click the name if you want to use a different name.
By default, Expression is selected as the Kind. This can be changed to something else (a constant for example) if not writing an expression
.
Start to type an expression in the Expression field. As you type, the software will attempt to mach with suggestions including already defined variables or commonly used functions along with the arguments needed. You can click to accept those suggestions or keep typing. Click "Show in Panel for more options (Annotation for example).
Click Save. If there are issues, a table will be displayed with the items needing correction in red such as needing to define the Kind. Fix the error and click Save again.. If all issues have been resolved, the Let will be added to the Formula Layer.
Creating Steps
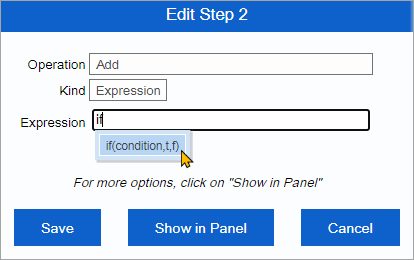
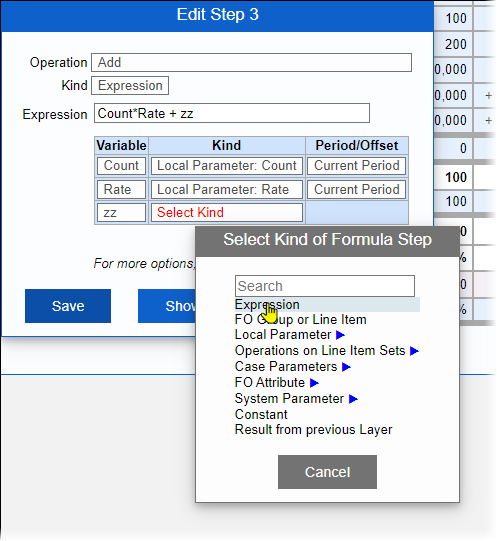
Click the orange 3-bar menu to the left of a Formula Layer and select "Add Step". A dialogue box will appear such as in the screenshots below.
An Operation of "Add" and Kind as "Expression" will be preselected by default. Click to select something different.
Start to type an expression in the Expression field. As you type, the software will attempt to mach with suggestions including already defined variables or commonly used functions along with the arguments needed. You can click to accept those suggestions or keep typing. Click "Show in Panel" for more options (Annotation for example).
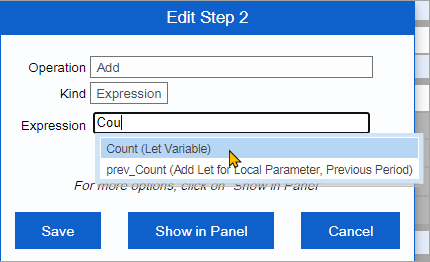
Click Save. If there are issues, a table will be displayed with the items needing correction in red such as needing to define the Kind. In this example below, a variable "zz" was used in the expression that has not yet been defined in a Let. Fix the error and click Save again. If all issues have been resolved, the Step (and any newly created Lets from this expression) will be added to the Formula Layer.
Explain Feature
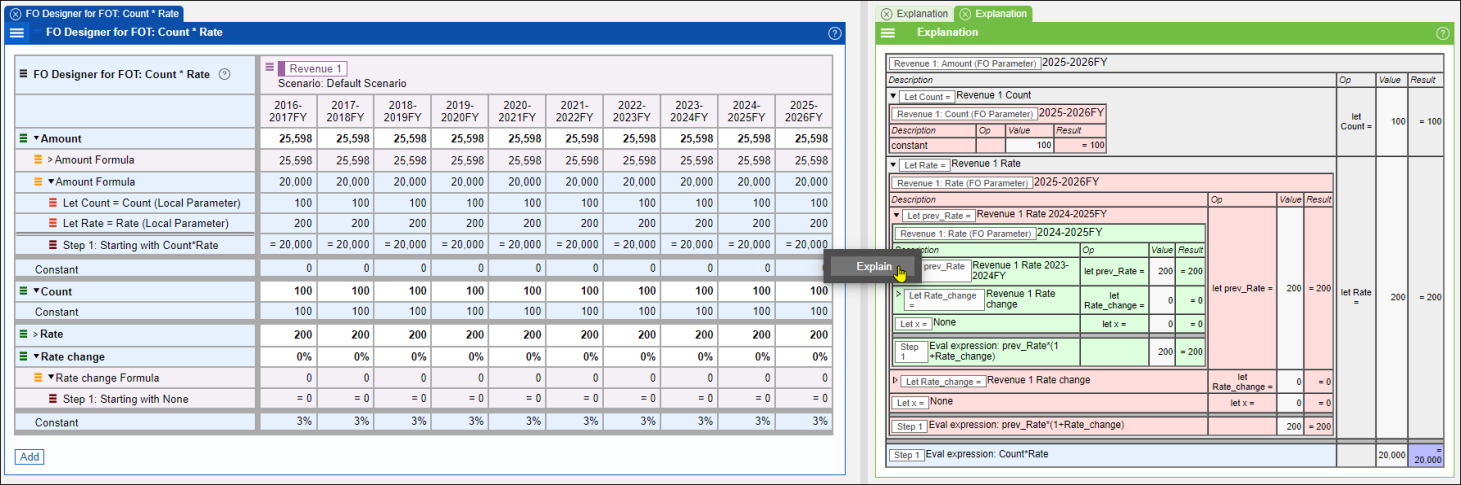
Synario’s Explain feature is available by clicking on a cell and selecting “Explain” at any level of a formula. Explain will open in a new panel. If a number for a Let or Step was selected, it will appear expanded or highlighted in the explain panel.
Explain is not currently available for cells related to the following parameters: Constants, Hub, and Connection to Hub.
Line Item Designer
Projection Maps have been redesigned as Line Item Designer offering similar layout and options available in FO Designer. Line Item Designer can be opened from the green 3-bar menu to the left of line item parameters of FO Designer for FO Types or FO Instances or by clicking on the line item in a standard FO Type or FO Instance panel.